By: Abbey Rebok
Are you tired of disposing of unused food that has rotted? Do you garden and produce a surplus of fruits and vegetables? Are you interested in making shelf-stable sauces, jams, and salsa, among other things? Do you have a desire to be self-sufficient and control what ingredients end up in your food? If you answered yes to any of these questions, then you may be interested in learning about a practice that has existed for centuries but has seen a resurgence in recent years: home-based canning.
Following the start of the COVID-19 pandemic, the sale of pressure cookers commonly used for canning soared. Glass canning jars, such as those supplied by the popular Ball Corporation, were in scarce supply in 2020 due to their inability to meet the sudden increased consumer demand. Interestingly, the demand for canning didn’t fizzle out as the pandemic waned. In fact, a wellness and nutrition educator at the University of Illinois Extension, Jenna Smith, saw her highest-ever enrollment in courses on food preservation in 2023. Some students sought to learn about food preservation in hopes of saving money, while others wanted to avoid preservatives and exercise more control over their ingredient intake. So, it’s clear that canning practices are thriving – but what does home-based canning entail?
In 1795, Napolean Boneparte offered a hefty reward of 12,000 francs (approximately $256,684.80 today based on 1 franc equals 0.29 grams of gold) to anyone who was able to invent a new food preservation system to aid the French military. Over a decade later, Nicolas Appert successfully developed the first – albeit crude – canning process in 1809. Appert’s canning method utilized sealed jars that were maintained at high temperatures for up to a few hours. While microorganisms were first identified in the late 1600s by Hooke and van Leeuwenhoek, it wasn’t until four decades following Appert’s canning invention that Louis Pasteur was able to explain why the canned food was free of spoilage: heat-treating the jarred food killed microorganisms inside, and the sealing of the jar prevented microorganisms from entering. In 1810, Peter Durand of England patented the use of tin-coated iron and began mass production of canned food. Iron was widely used due to its durability, but iron has the potential to rust which made it necessary to utilize a tin coating. This technology quickly moved to America and in 1812, Robert Ayers founded the first cannery, thus igniting the American canning industry.
With mass-production canning growing rapidly, there arose an opportunity to pivot canning practices towards the consumer. In 1858, John L. Mason patented the iconic Mason jar. In the years to follow, corporations still in operation today – such as Ball and Kerr Glass Manufacturing – began to dominate the home-based canning industry. Canning practices continued to flourish and reached their peak in 1943 amid food rationing during World War II. The USDA suggests that over four billion – yes, billion – cans and jars were produced that year with the help of over 6,000 locally operated, federally-regulated canning centers. While home-based canning continued after World War II, its central role in long-term food storage diminished due to the increased availability of refrigeration. Interestingly, home-based canning is rapidly growing today despite a clear reliance on refrigeration. If you want to get in on this trend, you’ll need a few basic supplies.
Canning supplies and initial setup
In the early canning years, there were limited guidelines in place to ensure consumer safety. With the help of the FDA and USDA, we now have a plethora of literature outlining proper, safe canning practices – but all this information may be overwhelming to a beginner. So, let’s start with the basics.
What supplies are necessary to can my own food, and what does the process involve?
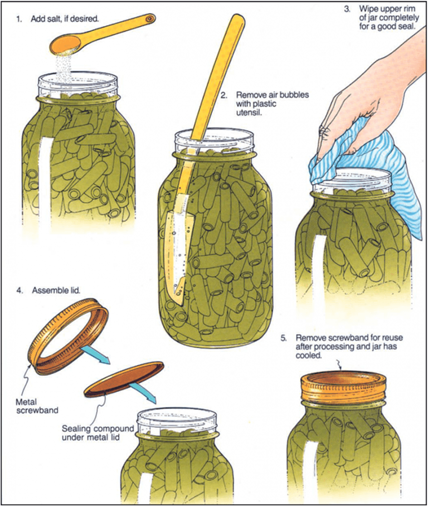
Home-based canning utilizes glass jars that vary in volume capacity and neck size. After thoroughly washing produce or cooking one of the many recipes for jams, jellies, and salsa, among others, jars are filled with enough food and liquid (if necessary) to create around a half inch void, termed headspace. Depending upon the food and canning methodology used (see below section), headspace may vary. The purpose of headspace is to allow expansion as the food is being heated. Overcrowding jars and leaving little headspace may cause food particles to seep from the jar and prevent proper sealing. Conversely, too much headspace may lead to food discoloration and potential spoilage due to excess air that may not have escaped during heating. Proper headspace is critical – but don’t fret – this isn’t a parameter you have to guess on and hope you get right. Canning guidelines and established recipes have already determined the optimal, safe amount of headspace for each food type.
Jar necks are then cleaned, and a metal lid and screw band (also termed ring band) are added (Figure 1). The metal lid seals to the jar during heating, while the screw band is temporarily placed to keep the lid in position. Following heating and subsequent cooling, the screw band is removed and can be reused. Lids should be tested after cooling to determine if sealing was successful. A few common methods involve examining the lid for a concave impression, tapping the lid with a metal spoon to hear a sharp ringing noise, and lifting the jar by the lid. Additionally, jars should be washed to remove any food particles that may have seeped out during heating before storing in a cool, dark environment. Metal lids are not recommended for reuse due to the higher probability of seal failure and should be purchased new. If you don’t want to utilize single-use metal lids, plastic lids with rubber rings sold by Tattler Lids are marketed as reusable. It’s important to still validate successful sealing every time with reusable lids.
Water bath vs pressure canning
To water bath or to pressure can: that is the question. Once you’ve successfully tackled preparing the jars by filling them with the food to be canned, the next hurdle is to understand which canning method is best for the given food.
Water bathing involves processing jars under a rolling boil for a predetermined amount of time. Water bath canning is recommended for high-acidity foods (pH < 4.6), such as pickles, jams, jellies, sauerkraut, and some types of tomatoes. The high acid content naturally helps to protect against microorganism growth, so the food does not need to be rigorously processed. The extent of the acid content determines the temperature and duration of heating. For example, many pickles can be safely heated under a rolling boil (212 °F) for less than 20 minutes to become shelf stable. If the acid content is too low to safely water bath, additives such as lemon juice, citric acid, or vinegar can be added before processing to adjust the final pH value. A challenge in home-based canning is the ability to test the pH of your food. Established recipes have been thoroughly tested to determine their final pH value, so following such a recipe overcomes this hurdle. If you’d like to can a family recipe with an unknown pH, some universities, such as the University of Idaho, will test your food for a small fee. Conversely, pH strips or a pH meter can be purchased for at-home use. Since a pH meter is more accurate, this option is recommended over pH strips.
If you’re canning foods whose acid content cannot be easily adjusted, pressure canning is the ideal method. The USDA strongly recommends pressure canning low-acidity foods, such as certain vegetables and meat products, to eliminate all microorganisms. During pressure canning, some of the water is converted to steam, which enables temperatures to rise to 250°F. Since water bath canning does not reach the high temperatures generated during pressure canning, water bathing low-acidity foods may not eliminate all microorganisms and is not recommended for these items.
Risk of botulism
If food is canned improperly, clear signs of microorganism growth will be present, right?
Wrong.
While mold and other growth can be obvious following a failed seal or improper heating, there exists a bacterium that cannot be seen, smelled, or tasted – clostridium botulinum. C. botulinum is commonly found in soil as spores and will grow in oxygen-free conditions. Canned jars can be a perfect breeding ground for C. botulinum due to the anaerobic (oxygen-free) environment created by the sealing process. Once the spores are activated and begin to grow, a powerful and deadly neurotoxin is produced. This neurotoxin, termed botulinum toxin, is the cause of botulism food poisoning. While the prospect of a deadly neurotoxin taking up the shelf space you’d reserved for canned peaches may be unsettling, botulism can be safely avoided by following guidelines set by the FDA and USDA. C. botulinum does not grow in high-acidity conditions (pH < 4.6), so water bathing high-acidity foods is a botulism-safe, federally approved canning method. Additionally, C. botulinum spores cannot survive temperatures greater than 240-250°F, and thus pressure canning eliminates the risk of botulism in low-acidity foods.
If you’re interested in starting your canning journey, become familiar with established safety guidelines. Utilize tried and true recipes with known acid levels and processing times, such as those published by the Ball Corporation. Remember that low-acidity foods require pressure canning to eliminate the risk of botulism. If you’re ever unsure about the safety of canned food, recall the adage when in doubt, throw it out.
TL;DR
- Canning reached its peak during World War II and began to decline due to refrigeration
- Home-based canning increased dramatically during the COVID-19 pandemic
- High-acidity foods can be processed using water bath canning, while low-acidity foods require pressure canning
- Improper canning can result in botulism food poisoning
